web/ (it was previously the separate axol-vr repo). The same web/ build also produces the web control panel, and axol serve serves both.
Hosted vs. self-hosted
Either way, the headset connects to the VR WebSocket server on port 8000 that
axol teleop (and the control panel’s teleop/collect operations) runs on the host.
On the connect card, tap the Axol Host Address field for a dropdown of the last five hosts the app connected to successfully, newest first — pick one or keep typing. A host is remembered only once its teleop socket actually opens (including ?host=…&autoconnect=1 links), and the list is the VR app’s own, kept in the headset browser separately from the control panel’s recent hosts.
On networks where Wi-Fi adds latency, tick Quest over USB on the connect screen to stream controller poses over a USB cable instead — the camera feeds keep using the LAN. See Quest over USB.
Repository layout
Build & develop
Fromweb/:
Deployment
The hosted app is built on Vercel;vercel.json builds the client package first so it’s available as a local workspace dependency:
Camera views
When the host has camera video enabled (axol teleop --cameras, collect-data, or the control panel with camera slots assigned), the robot’s camera feeds stream to the headset over WebRTC and render as screens over passthrough.
All streamed feeds are shown at once — the overhead centered (rendered per-eye in true stereo when the overhead is a stereo ZED X) with the left and right wrist cams as bottom-corner picture-in-picture panes. There’s no view to switch between; you arrange the screens to taste instead.
The screens are world-anchored — like TVs placed where you were looking when the session started, so you can move your head freely while they stay put. While arm tracking is disengaged you can rearrange them:
- Move a screen — point a controller at it and hold the trigger, then move the controller to reposition it. Each screen remembers its own spot.
- Resize a screen — grab the same screen with both triggers and move your hands apart to make it bigger or together to make it smaller.
- Reset — press B (right controller) to re-anchor every screen to your current gaze and clear all moves and resizes.
Controller bindings
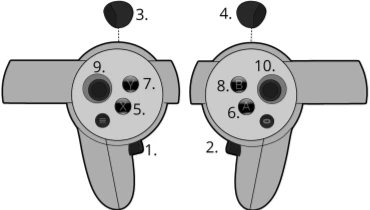
Engaging and freezing arms. Tracking always starts with both grips together from rest. Once engaged, the grips act per arm: a click freezes only that arm — it holds its pose and keeps its gripper where it is, so it can steady a grasped object while the other arm keeps working — and another click resumes it. A forced disengage (a reset, a contact stop, or a dropped link) drops both arms and needs a deliberate both-grips re-engage. Prefer a dead-man feel? Turn on Hold grips to engage (the
hold_to_engage setting, or --teleop.hold_to_engage) and each arm tracks only while you hold its grip.The session’s mode is fixed by the command that launched it — there’s no in-headset toggle between the two.
axol teleop runs plain teleop (recording is unavailable, so A does nothing and the HUD stays on Teleop), while axol collect-data runs data collection (recording enabled, HUD starts on Data Collection).A dropped link never moves the robot. If the pose stream stops while tracking is engaged — you doff the headset, open the system menu, quit the app, or the link drops — the arms auto-disengage after about half a second and hold position wherever they are. When you return, re-engaging (both grips) never jerks the arms toward the controllers: in the default clutch mode it takes a fresh snapshot, and in ramp mode it eases them over (see Re-engaging); press X to send them back to the rest pose when you’re ready.
Re-engaging
Every time a grip re-engages an arm — you froze it, walked away from the robot, or someone moved the arm by hand — your controller is somewhere and the arm is somewhere else, and the server has to reconcile the two. Two behaviours are available, both useful; the Ramp button on the HUD tool row (or the Re-engage row of the session settings) picks one for the session — the server owns it and echoes it back to every client, and the control panel’s Re-engage setting /--teleop.reengage sets the startup default:
In either mode the engage-edge frame itself never moves the arm. The ramp anchor is dropped by a reset / return to rest (the first grip afterwards snaps fresh, so the arms never jump out of rest), and engages within box mode ignore the toggle — they already blend the pair into the parallel grasp — but leaving box mode in ramp blends both arms back out to the controller mapping from before box mode.
Box mode
Box mode is built around the parcel gripper and exists only when the robot is set up with it — control panel Robot → Gripper =
parcel (--axol.gripper parcel). With the stock parallel gripper (the default) the Box button, the both-sticks gesture and every box-mode setting are absent from the headset and the control panel.--teleop.box_mode). The server owns the mode and echoes it back to every client, so the HUD toggle always shows the live state. Switching engages at once, no grip needed: into box mode the pair is led by your right hand straight away (the Box lead hand setting, --teleop.box_lead_hand, picks the left instead), and out of it both arms engage together — in ramp re-engage they blend back out to wherever the controllers are. A switch made from the control panel with nobody in the headset waits for the grips as usual.
The natural moment to switch is once you’ve brought the grippers roughly into that grasp with two-handed teleop: the Box button reads Box: OFF (aligned) (in blue) while the two grippers already point forward with a flat face toward each other across a box-sized gap — the IK worker checks the pair geometry a few times a second — meaning the engage blend will barely move them. Click both sticks and lead — the right hand has the pair from the moment the mode switches.
While box mode is on:
Both sticks do the same things, so it doesn’t matter which hand is leading, and clicks aren’t modifiers — the sticks never move the pair (that’s the leading hand’s job), only shape the grasp. The grippers’ yaw is set by the grasp alone (plus the fixed
--teleop.box_grip_tilt calibration trim, default 0), and only the direction the stick is pushed further along counts, so a thumb drifting forward while widening never moves the elbows, nor the other way round. The sticks belong to the arms only while a grip is leading; see Driving with the box below for moving Jelly. The rates live under --teleop.box_width_speed (m/s) and --teleop.box_elbow_speed (°/s).
Two grasps. Box mode has two ways of holding the grippers, and both are needed with the parcel gripper (--teleop.box_grasp picks the one a session starts in; the Box grasp live setting or a click of either thumbstick while a grip is leading switches):
- straight (default) — fingers straight forward (yaw 0°), the flat face on the box: the parcel gripper’s folded plate, flat along the side.
- flush (angled) — each gripper rolls 39° inward from the parallel grasp (
--teleop.box_flush_deg, live as Angled yaw) about the plate’s front edge, onto the plate’s 39.2° chamfer facet, which then touches the box together with the fixed blade’s tip; the edge — and so the box contact andwidth— stays where the straight grasp had it. The parcel gripper’s blade stays at its open stop, as it does everywhere. Release the triggers before you close the width.
box_align_duration, each gripper turning about that edge, and the leading hand re-anchors (nothing jumps) — you can switch with a box already clamped. The toggle fires on the release of a single click; a click that becomes the both-sticks gesture (leave box mode) doesn’t count. The Box button names the grasp in force: Box: ON (straight) / Box: ON (flush).
The parcel gripper. Box mode places the gripper’s contact face, not its mount. The parcel gripper has a fixed blade across the mount axis from the box and a hinged plate that, opened fully, folds back along the wrist on the box side at its stop. A released trigger opens the plate all the way to that stop — wherever the calibration found it; the stop’s angle is never assumed — in plain teleop and in both box grasps. Box mode measures width between the contact faces — the folded plate’s face, 41.5 mm toward the box from each mount axis, in the straight grasp; its chamfer facet and the fixed tip in the angled one — and the angled grasp pivots about the plate’s front edge, where the two meet; if the pair doesn’t sit right on the box, trim with --teleop.box_grip_tilt or change Angled yaw.
Each gripper turns one of its two flat sides toward the box. By default that’s whichever is nearer to its current pose, so the wrists never flip through half a turn to get into the grasp — a coin toss for the parcel gripper, whose hinged blade is on one particular side. If a gripper engages with its fixed blade toward the box (the blade folds away from it) or its motor cap facing down, pin that arm with the Left face / Right face live settings (--teleop.box_face_left / box_face_right: auto, +x, -x) — try the other value and re-engage. Face settings are read at each engage.
Driving with the box. Box mode has two states, and the thumbsticks follow them. While a grip is leading the pair, the sticks set the grasp as in the table above and Jelly stands still. Click the leader’s grip again to freeze the pair — the arms hold the box exactly where it is, grippers still closed — and the sticks go back to driving Jelly with the ordinary mapping (left stick: drive/strafe, right stick: turn, clicks: lift). So the carry is: grab the box, freeze, drive across the room, press a grip to lead again and adjust. The hand-over to Jelly waits until you’ve let go of both sticks, so a stick you were holding when you clicked the grip can never turn into base motion. Frozen grippers keep their last command, but as soon as a grip leads again each gripper follows its own trigger — so squeeze both triggers before taking the lead back, or the box is released. Leading again from the frozen state re-runs the alignment blend from wherever the grippers are, which for an unmoved pair is a no-op.
Elbows and the torso. A gripper pose fixes the wrist but not the elbow, which can still swing about the shoulder-to-wrist line. In ordinary teleop your own arms keep that swing sensible, but box mode’s poses — parallel, fingers forward, closing on each other — are ones nobody makes with a controller in hand, and from a normal reach the nearest solution can fold an elbow inward, toward the base. The IK’s arm↔torso collision model (KinematicsConfig.self_collision, on by default) is what stops that: it penalises an arm approaching the torso and hard-stops any step that would bring it within the clearance margin, so the width jog simply stops closing rather than pushing an elbow through. An IK elbow hint (--teleop.box_elbow_weight, default 10; 0 = off) holds the elbows --teleop.box_elbow_out degrees out from straight down (30 to start), and the sticks’ forward/back moves that angle live, so you can bring the elbows in past a doorway or flare them out over a wide box without touching the pair. The hint only ever asks an elbow to move along the arm’s own swing, and box mode holds the gripper poses at four times the usual orientation weight, so the hint never tips a gripper off its target — a clamp needs each gripper’s yaw to a fraction of a degree (half a degree holds the angled grasp’s tip a millimetre off the box). With the hint off the elbows are left where they fall and the sticks’ elbow control is inert.
How hard it squeezes — and where. Bringing the width in past the box doesn’t stop at contact — the IK targets go on into the box, and an impedance-controlled arm presses with kp times that run-ahead: roughly 6 N more per centimetre of width you jog past contact. And a plain lateral run-ahead is a force at the gripper mount plus the moment it takes to hold the mount’s orientation fixed against the arm’s stiffness coupling — about 1.5 Nm per centimetre at a box-carrying pose. The parcel gripper doesn’t touch the box at the mount: in the angled grasp its plate’s chamfer facet presses ahead of the wrist and the fixed blade’s tip 7 cm further along the side, and that moment can only be carried by those two loading unevenly — the facet digs in as the tip lifts (or the other way about). That is the pinch: tip and face touch together at first contact, then one sinks in and the other comes away.
The squeeze lean fixes that at the target. From each arm’s Jacobian at its commanded pose and its joint stiffness, the worker knows the run-ahead that produces a pure force through the centroid of the gripper’s contact points — in the angled grasp the top and bottom of the chamfer facet (43 mm tall) and of the tip edge, so facet and tip take half each with no pitch or roll left to unbalance them; in the straight grasp the corners of the plate’s face — and leans each gripper’s target by the difference: an inward yaw of about 1.3° per centimetre of clamp depth, a fraction of roll, a millimetre of translation. The one thing measured is the clamp depth — how far the targets sit past the measured mounts along the pair’s inward normals, averaged over both arms (carrying the box loads one arm’s side and unloads the other’s by the same amount, so a carry adds nothing) and low-passed 0.2 s. The lean is proportional to it, so nothing is added before contact, and it is an offset to the target: the arms stay position controlled, the command path is untouched and neither arm is ever held back from a move. --teleop.box_squeeze_lean scales it (1 = the model, on by default; live as Squeeze lean): raise it if the tip still lifts as you squeeze, lower it if the facet lifts instead, 0 turns it off.
The squeeze trim closes what the model misses. The lean is open loop, and the arm is not quite its model: gear backlash, the wrist’s own give and the gripper flexing under load all let the tip swing off the box further than the joint springs say — so a heavy box, which needs more depth for the friction to carry it, still showed the pinch. The trim works from the one thing the encoders do see: the yaw between each gripper’s measured mount rotation and its parallel slot, signed tip-out — per arm, because the two give differently (the grippers are identical parts, not mirrored, so a clamp loads their blade hinges opposite ways, and one trim for both left the worse side short). While the grippers press, each arm’s toe-out is integrated — 1° of it adds 1°/s — into an extra inward yaw of its own target, never more than --teleop.box_squeeze_trim degrees (5; live as Squeeze trim, 0 = off), and it bleeds away over a second once they don’t. A turn of the pair lags both arms the same way about vertical (toe-out on one side, toe-in on the other), so the trims only integrate once the pair has been still for 0.3 s. They settle where each measured face is parallel to the box, tip and root both on it, whatever the unmodelled give was, about a second after the clamp. The Box button on the HUD shows the clamp force the pair is pressing with and the mean trim (Box: ON (straight, 6 N, 2° in)); the teleop log prints a box clamp: line once a second while pressing with each arm’s depth, force, toe-out and trim.
An optional force cap, --teleop.box_squeeze_force (N, 0 = off by default; live as Squeeze force), bounds the clamp: the lean knows the force the depth produces, and past the cap the targets are pulled back out along the normals to the cap’s depth — the same on both arms, so the pair stays a pair — and the grippers press with the cap however far you jog the width in, at any pose (a fixed shoulder torque alone would let the force double as the box is raised, since the shoulder’s lever to the gripper halves). 8 N a side holds a light parcel with margin; raise it if boxes slip, lower it to be gentler. An opt-in per-joint squeeze cap, --teleop.box_squeeze_torque (Nm, 0 = off by default), can additionally hard-cap the spring torque of the two shoulder joints that carry a sideways push (shoulder_2, the abduction axis, and shoulder_3): each command is backed off toward the measured pose — the whole arm by one fraction, keeping its shape — until those joints’ spring torque is within the cap, and the realtime core holds each within cap ÷ kp of measured. It is off by default because a torque cap cannot tell a squeeze from a move — the shoulders’ servo lag while you carry the box is a few degrees, more than any useful cap allows — so with it on, the arm moving toward the other trails the move and the pair skews. Box mode also caps the wrists (wrist_2 / wrist_3) at --teleop.box_wrist_torque (5 Nm; plain teleop leaves them uncapped), and every cap is lifted during a return-to-rest. All three are hardware only: the sim has no compliance and reports no measurement.
The wrists’ limit. However hard you jog, the clamp also stops at what the wrists can press evenly with. wrist_2 holds the moment that keeps the tip on the box — about 0.13 Nm per newton of clamp — and box mode caps its spring torque at 5 Nm (--teleop.box_wrist_torque; plain teleop leaves the wrists uncapped), so past ~39 N per side every extra newton would go where wrist_2 adds nothing (its own axis, behind the facet): the tip comes off and the facet takes it all. The worker holds the clamp at 80% of that point (~31 N a side at a box-carrying pose, recomputed from the arm’s pose each frame) by pulling both targets back the same way the force cap does; the clamp log line notes it (held at the wrists' even-clamp limit). More than that needs a higher box_wrist_torque, which costs the small wrist motors heat.
Alignment. For the whole of box mode the IK’s posture attractor follows the arms instead of staying pinned at the engage pose. Pinned (normal teleop’s behaviour) it balances the gripper targets well short of parallel — in offline replays of a chest-height close the pair ended up 2–4 cm too wide and twisted 5–13° — so the grasp looked skewed and the inward tilt never met the box evenly; following, the pair lands within a millimetre and a tenth of a degree of the ideal. Any misalignment left on the real robot is then wrist compliance under the clamping load (spring torque ÷ kp, ~2° at box mode’s 5 Nm wrist cap) and kinematic calibration, not the solve.
Leaving box mode. Click both thumbsticks together again — together meaning within about a third of a second of each other, since a stick that’s already held down (outside box mode that’s Jelly’s lift) doesn’t count when the second one is pressed. Or use the Box button / the control panel. Both arms engage in plain teleop as the mode switches — in ramp re-engage each blends back out to where its controller is by the controller↔arm mapping you engaged with before the box, the leading hand’s included (box mode keeps its own anchor for the leader and leaves that mapping alone); in clutch they stay put and follow from there. A quick “double click” of the sticks is treated as one gesture — the mode toggles once, not back and forth. If the pair is in the angled grasp when you leave while leading, the grasp goes back to straight first — the pair levels over box_align_duration (~1.5 s) under your hand, then the mode switches — so ordinary teleop’s re-engage ramp starts from two straight wrists rather than two yawed into the box (let go of the grip, or ask again, to leave at once). Pressing X to go home always leaves box mode too: the arms come back as two arms.
After a hand-off. When a person has taken the object or moved the arms by hand, the grippers rarely end up in a pair — but a box-mode engage doesn’t care where they are: its first step is always the blend into the parallel, side-clamping pair at the arms’ current midpoint and width, so just grip again and the leader takes over once they’re aligned.
Session settings
A few settings are worth changing during a session rather than restarting for. They live behind the Settings button on the HUD tool row (a panel with[-] / [+] steppers; a toggle or a choice flips on either) and, identically, in the control panel’s Session settings card next to the camera feeds — both talk to the same server state, so a change made at the desk shows up in the headset and vice versa. The two most-used ones, Box and Ramp, also sit directly on the tool row.
The box-mode rows appear only with the parcel gripper (above). The startup values come from the command line / the control panel’s saved settings; live changes last for the session only. The list is defined once on the server (
almond_axol.teleop.live) and both UIs render it from the published schema, so the panel and the headset can never disagree about what’s adjustable.
Jelly
Robots equipped with Jelly (an x-drive omni-wheel base plus a telescoping lift) are driven from the headset thumbsticks, so an operator can reposition the whole robot without leaving VR:- Left thumbstick — drive the base: push to move forward/back and left/right (strafe).
- Right thumbstick (x-axis) — rotate the base.
- Stick clicks — press the left stick in to lower the lift, the right stick to raise it (each while held).
can_alm_axol_b), the lift when its controller is (its own can_alm_axol_c bus, or sharing the wheel bus). The control panel’s automatic CAN discovery pins those names when the adapters first appear (or run can.setup). The Robot tab of Axol settings has three switches for what a session drives — Axol arms, Jelly wheels, Jelly lift — each an opt-out for hardware that is attached (or axol teleop --arms false / --jelly.wheels false / --jelly.lift false); the tunables live under Advanced → Jelly (or the --jelly.* flags). Switching Axol arms off drives only Jelly with the arms left untouched — no Axol connection or motor check needed — which also happens on its own when the arm hub is absent but Jelly is attached.
The telescoping lift needs a one-time axol lift.home calibration before it will move, and axol lift.goto raises it to the robot-install height; both are also on the panel’s diagnostics dashboard under Diagnostics.
State machine
In teleop mode the headset stays inTeleop with the recording controls inert. In data collection mode it starts in Data Collection and drives episodes with A / X:
DataCollection; it becomes Recording once the countdown completes.
Stopping a recording is confirmation-gated: the first A (save) or X (discard) press while recording arms an in-headset Save episode? / Discard episode? popup instead of stopping immediately — pressing the same button confirms, the other cancels and keeps recording. Nothing is committed server-side until you confirm a save; confirming a discard drops the take (via the reset flag) so you can re-record.
During data collection the HUD also shows an Episode N readout (top-right, under the recording status) so you can see which episode you’re about to record. The server announces it on connect — a headset joining mid-session shows the right number immediately — and it’s hidden in plain teleop. See the VR server API for the
episode feedback message.{"type": "state", "value": "saving"} and blocks every control except Y (exit) until the episode is written, then pushes data_collection to re-enable controls. Broadcasting error shows an error indicator in the headset. See almond_axol.vr for the frame protocol and send_feedback_state().
Next steps
Teleoperation
Go from install to a live VR session.
VR server API
The WSS server, frame schema, and feedback messages.