
observation.pose_lag; on-robot recording fills that column automatically. If the dataset began on Axol without it, later Mantis recording keeps the original schema and omits that optional column.
You can launch either profile from the web control panel or the CLI (axol collect-data). Quest uses the A button for recording. Managed Lighthouse/Ultimate Mantis runs use rig-trigger gestures (both squeezed then released to engage and start; x3 to save, x4 to discard), and the control panel can drive every source with on-screen episode buttons.
Before you start
- Axol installed (one-command install) and the selected device connected: Axol, or Mantis with its hardware and pose source set up (setup complete under Mantis settings → Tracking, and an approved factory or measured tracker→TCP transform for both sides).
- At least one ZED camera connected over GMSL and assigned with Record enabled. Axol uses the overhead / left arm / right arm slots; Mantis uses the separately stored Left Mantis / Right Mantis layout.
- A Meta Quest with the VR TLS certificate authorized once — for Axol, and for Mantis with the Quest source. Lighthouse/Ultimate Mantis collects with no headset.
Run it
- Axol
- Mantis
1
Connect the robot and assign cameras
Connect the Axol Host and, with Axol selected on its tile, the robot. Open Axol settings → Cameras and assign each detected camera to its slot (overhead / left arm / right arm) — at least one with Record enabled. Stereo ZED X cameras are detected automatically. See Cameras.
2
Select Collect Data and fill the fields
Pick Collect Data. Set the dataset repo id — type a new one (e.g.
myorg/pick-place) or pick an existing dataset from the dropdown (each shown with its episode count) to resume it — and the task description; those are the only per-run inputs. Everything reusable (fps, teleop rate, stiffness, push-to-hub) lives in the Settings tabs.3
Start and record from the headset
Press Start, connect the headset, and drive the arms. Recording is normally controlled from the VR controllers — see Recording an episode below — and the panel mirrors the camera feeds and episode state while you go, with on-screen buttons for the same decisions (Driving from the panel).
The session is locked to data collection; there’s no mode toggle.
--robot_config.cameras "{overhead: {serial: 41234567}}" records the overhead alone). The cameras dict is one inline YAML value (see Command configuration). Stereo ZED X cameras are detected from their serial automatically: a stereo overhead records both eyes as overhead_left / overhead_right, while a stereo wrist records its left eye under the plain slot name (like a mono camera). To override the auto-detection, set stereo: true together with the eye policy you want — eyes: both records X_left / X_right, eyes: left (or right) records a single eye under the plain name X (so a forced wrist needs eyes: left to stay single-eye). For example, to force the overhead:Ctrl+C to finish. See collect-data for the full field list (--fps, --teleop_hz, stiffness, --push_to_hub) and Command configuration for the override syntax.Quest controller layout
For Axol and Quest-source Mantis, episodes can be driven from the Quest controllers (the control panel can take the same decisions — see Driving from the panel). The movement controls are the same as in teleoperation; data collection adds the A record button. Lighthouse/Ultimate Mantis uses the rig-trigger gestures in the Mantis tab above instead. The session is locked to data collection mode, so there’s no mode toggle.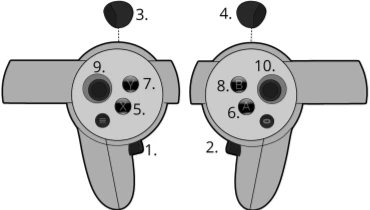
The camera feeds are relayed to the headset during collection, so you can line up takes from the robot’s point of view.
Recording an episode
1
Drive to the start pose
The session is already in Data Collection — put on the headset, engage tracking, and drive the arms to where you want the take to begin.
2
Start a take
Press A to begin recording — a 3-second countdown runs, then frame capture begins. Press A again during the countdown, or X, to cancel.
3
Finish the take
Stopping is confirmation-gated — the first press arms an in-headset popup instead of stopping immediately, so a fumbled button never loses a take:
- Press A to arm Save episode? — press A again to save, or X to cancel and keep recording.
- Press X to arm Discard episode? — press X again to discard and re-record, or A to cancel and keep recording.
4
The arms return home — guarded
After a take ends — saved or discarded — the arms head back to the rest pose on their own, but guarded: a torque watchdog compares every joint against the gravity model as the move plays.If the move meets unexpected resistance — a gripper still hooked on a handle, or you grabbing an arm — it stops where it is and the arms drop into a limp gravity-compensation hold, free to be hand-guided. Ease them clear of the scene (the episode keeps saving in the background), then press X to send them home again — the return replans from wherever you left the arms. Recording is blocked while limp; pressing A just gets you a reminder to reset first.The grips can’t engage tracking during this stretch — from the end of the take until the arms are home and the episode has finished saving or discarding, a squeeze is ignored. Once it’s over, release both grips, then squeeze both again to engage; a grip held through the save doesn’t count.The same guard covers every rest move — an X reset between takes and the startup move too, not just the post-episode return. Its sensitivity is the Reset contact threshold in the control panel’s Axol settings → Robot (
--teleop_config.vr_teleop_config.reset_torque_threshold on the CLI) — raise it if normal returns trip it falsely, or set 0 to disable it and always complete the return.You can also arm a watchdog for the tracking phase — while you’re actively driving the arms during a take. It’s off by default (recording pushes on the scene on purpose): set the Teleop contact stop in the control panel’s Axol settings → Robot (--teleop_config.vr_teleop_config.teleop_torque_threshold; the panel suggests 16 Nm). A trip mid-take disengages tracking, discards the in-flight episode, and drops the arms limp — clear them by hand, then press X to return to rest and re-record. Shared with teleop, so both flows behave identically.
Collection resumes from an existing dataset at
--root; an aborted session that saved no episodes is cleaned up on shutdown.
Driving from the panel
The Axol flow above assumes the headset is on your face; managed Lighthouse/Ultimate does not require one. When you launch from the control panel, it doubles as an operator display and can take the same episode decisions for either profile. The panel mirrors the camera feeds the headset receives (with a fullscreen toggle for a proper operator display) and an Episode control box carrying the phase, the episode number, the saved count, and the buttons that make sense right now: Start recording (a 3-second countdown mirroring the in-headset one, so you can pick the controllers back up; click again to cancel), Save episode, and Discard episode — the last two click-to-confirm, standing in for the controller’s double-press. During a contact hold a Return to rest button appears, which does what X does: replan the return from wherever you left the arms. The controller stays live the whole time — the panel is a parallel input, and whichever arrives first ends the take. Anything you arm on the controller (the confirmation popup, the record countdown) is mirrored into the panel too, so the dashboard follows a controller-driven session as well as a panel-driven one. See Episode controls.Crash-safe by design. Every episode is durable the moment it saves — its parquet footers are flushed and recording rotates to fresh per-episode files — so at any point between saves the dataset on disk is complete and resumable, and killing the recorder costs at most the take being written. Finalizing on stop is near-instant now (no session-length flush or whole-session video re-verification), so there’s no slow shutdown tempting a hard kill. A resume still runs a crash-consistency check for that one in-flight window (and for datasets recorded before durability landed): if the saved episodes aren’t a contiguous
0…N-1 — the tell-tale of a recorder killed mid-save, where buffered episodes were lost while the counter had already advanced — the dataset is repaired in place, truncating back to the longest intact run of episodes and resuming after it (recording past the gap would silently pair every later episode with a different episode’s video). Only if not a single complete episode survives does it refuse and point you to delete the dataset. Keep the host on a current release to pick this up on an older station.Saved takes are integrity-checked. If the camera encoder drops frames during a take (a feed-queue overflow under heavy load), the video no longer lines up with its recorded rows — so that episode is discarded instead of saved, with an error explaining why (in the CLI output / control panel log console). The session stays up — the next take starts as usual — so re-record it rather than adding a misaligned episode to the dataset.
The full controller bindings and headset state machine are documented in the VR Interface guide.
Next steps
Config Parameters
Every setting for data collection, with its default.
Run Policy
Run a trained policy autonomously on the same machine.
collect-data reference
Every flag and the dataset capture internals.