> ## Documentation Index
> Fetch the complete documentation index at: https://docs.almond.bot/llms.txt
> Use this file to discover all available pages before exploring further.
# Teleoperation
> Drive Axol live from a VR headset — from the web control panel or the CLI, on real hardware or in sim.
Teleoperation drives the robot live from a Meta Quest headset: the headset streams your hand and elbow pose to the SDK, which solves IK and commands the arms. You can run it two ways — from the **web control panel** (browser) or the **CLI** (`axol teleop`) — and against either the **real robot** or the **software simulator** (no hardware needed; the sim just swaps the motors for a browser visualizer).
## Before you start
* **Axol installed** — the [one-command install](/installation) on the robot machine, or a [development install](/advanced/development-install) for sim.
* **CAN up and motors verified** (real robot only). The control panel does this for you on connect; on the CLI run [`axol can.setup`](/cli/can-setup) once, then check a motor with [`axol motor.info`](/cli/motor-info).
* **A Meta Quest** on the same network, with the [TLS certificate authorized](#authorize-the-tls-certificate) once.
No CAN setup or motor check is needed in **sim** — there's no hardware to talk to.
## Authorize the TLS certificate
The VR app connects over a self-signed HTTPS/WSS link, so its certificate needs a one-time approval in the headset browser — otherwise the WebSocket handshake is silently rejected.
The easiest way is from the app itself: when you press **Connect** and the certificate hasn't been approved yet, the connection fails and an **Authorize certificate** button appears. Tap it, proceed past the warning in the popup, and the app reconnects automatically. You only need to do this once per headset (the cert is cached in `~/.almond/vr/certs/` on the host). To approve it manually instead, open `https://.local:8000` or `https://:8000` in the headset browser and proceed past the warning.
## Run it
Open the control panel and connect the **Axol Host** — the panel then brings up the robot automatically (running `can.setup` the first time); if the **Axol** tile isn't green, press **Connect** on it. For **sim**, you can skip the robot connection. See the [Web Control Panel guide](/guides/control-panel#connections) for the connect flow.
To see the robot's camera feeds in the headset, open the **Cameras** settings tab and assign the ZED cameras to their slots. Skip this for camera-free teleop. See [Cameras](/guides/control-panel#cameras).
Pick **Teleoperation** from the operation selector. Toggle **sim** to drive the browser visualizer with no hardware. Press **Start**. The panel begins streaming and is ready for the headset to connect.
Put on the Quest, open the VR app at [axol.almond.bot](https://axol.almond.bot), enter the host's address, and press **Connect** — then **Start** to enter the session.
On the robot machine:
```bash theme={null}
axol teleop
```
For **sim**, add `--sim` — this opens a browser visualizer at [http://localhost:8002](http://localhost:8002) and runs the same VR server on port 8000, so you can drive the simulated robot from the headset exactly like the real one (great for verifying network and tracking before powering the robot):
```bash theme={null}
axol teleop --sim
```
The terminal prints the hostname and IP. Open the VR app at [axol.almond.bot](https://axol.almond.bot) on the headset, enter either address, and press **Connect**, then **Start**.
Have ZED cameras attached? Pass `--cameras "{overhead: 41234567, left_arm: 41234568, right_arm: 41234569}"` to relay the overhead and wrist feeds into the headset — all shown at once, each movable and resizable with the controllers. See [Camera views](/guides/vr-interface#camera-views).
See the [`teleop`](/cli/teleop) reference for the full flag list (stiffness, gripper limits, per-joint gains, config files).
## Controller layout
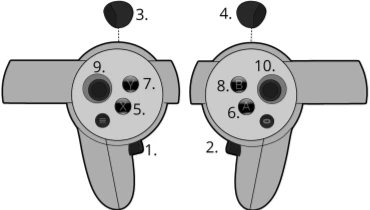 | # | Button | Action |
| - | ------------- | -------------------------------------------------------------------------------------------------------------------------------------------------------------------------------------------------- |
| 1 | Left grip | Press both 1 + 2 together to **engage** both arms; once engaged, each grip **toggles its own arm** between tracking and frozen (a frozen arm holds its pose and grasp while the other keeps going) |
| 2 | Right grip | Same as above |
| 3 | Left trigger | Actuate left gripper |
| 4 | Right trigger | Actuate right gripper |
| 5 | X | **Reset** — returns both arms to the rest pose; also retries the return out of the contact hold (below) |
| 7 | Y | **Exit AR** — closes the VR session (the arms return to rest on the way out) |
**Per-arm engage.** From rest, press both grips together to start moving the arms. After that each grip is independent: a click **toggles just that arm** between tracking and frozen — a frozen arm holds its pose and keeps its gripper where it is (handy for steadying a grasped object) while the other keeps tracking. Prefer a hold instead of a toggle? Turn on **Hold grips to engage** (`--teleop.hold_to_engage`): hold both grips to start, release one to freeze that arm, keep holding to keep it going. Either way a forced disengage (reset, contact stop, or dropped link) drops both arms and needs a deliberate both-grips re-engage.
On hardware, every return to rest — an **X** reset, the **Y**-exit return, and the startup move — is **guarded**: a torque watchdog compares each joint against the gravity model while the move plays. If the move meets unexpected resistance (something still grasped, or you grabbing an arm), it stops where it is and the arms drop into a limp **gravity-compensation hold** — hand-guide them clear, then press **X** to replan home from wherever you left them. If no headset is connected to press **X** (a **Y**-exit return, or the headset died), the hold settles into a position hold where the arms are after \~30 s; reconnect and press **X** to send them home. Tune with the **Reset contact threshold** in the control panel's Robot settings (`--teleop.reset_torque_threshold` on the CLI; `0` disables the watchdog). Not available in `--sim` (no torque feedback — and nothing to protect).
**Contact stop while driving (opt-in).** The return-to-rest guard above is always on; you can also arm a watchdog for the **tracking** phase itself — while you're actively driving the arms. It's **off by default**, since teleop pushes on the scene on purpose. Set the **Teleop contact stop** in the control panel's Robot settings (`--teleop.teleop_torque_threshold` on the CLI; the panel suggests `16` Nm) and a sustained torque past the threshold **disengages tracking** and drops the arms into the same limp gravity-comp hold — hand-guide them clear, then press **X** to return to rest and carry on. `0` (the default) leaves it off. Hardware only.
**Losing the link never moves the robot.** If pose updates stop while tracking is engaged — you doff the headset, open the system menu, quit the VR app, or the link drops — the arms **auto-disengage** (freeze in place) after about half a second and then **hold position** wherever they are, for as long as it takes you to come back. Re-entering VR is inert until you deliberately re-engage (both grips), which takes a **fresh engage snapshot** — tracking resumes relative to where the arms already are, so they never snap toward wherever the controllers drifted during the gap. Press **X** when you want them back at the rest pose.
On a robot with the **powered Axol Cart**, the headset thumbsticks drive the cart's base and lift during teleop — see [Powered cart](/guides/vr-interface#powered-cart). Enable it with the control panel's **Powered cart** toggle or [`axol teleop --cart.enabled true`](/cli/teleop), or drive just the cart with the arms left untouched using **Cart only** / [`axol teleop --cart_only`](/cli/teleop).
## Network tip
If VR tracking feels jittery or arrives in bursts, configure the following on your router or access point:
| Setting | Value |
| ----------------- | -------- |
| DTIM interval | `1` |
| Beacon interval | `100` ms |
| WMM APSD (U-APSD) | disabled |
These prevent the AP from batching packets between beacon intervals, which causes intermittent latency spikes that are especially noticeable in VR.
## Latency tuning
Teleop deliberately trades a little latency for smoothness: the pose stream is buffered and filtered before it reaches IK so that controller tracking glitches and network jitter don't turn into arm jitter. The defaults add roughly **80–90 ms** between your hand and the commanded arm on a clean link — the table below shows where it goes and which knob controls each stage. All of them are CLI flags (or [config-file](/cli/configuration) fields); none require code changes.
| Knob | Default | What it buys | Latency cost |
| ------------------------------------ | ------- | ------------------------------------------------------------------------------------------------------------ | ----------------------------------------------------------------------------------------------------------------------------------- |
| `--vr_server.interp_smooth_window_s` | `0.12` | Zero-phase pose smoothing + tracking-glitch rejection (glitches up to \~half the window are erased outright) | **+60 ms**, fixed — half the window. The largest single contributor |
| `--vr_server.interp_max_delay_s` | `0.15` | Cap on the adaptive jitter buffer that replays bursty network delivery smoothly | 0 ms on a clean link (USB, quiet Wi-Fi); grows only while the network is actually jittery, up to the cap, and decays within seconds |
| `--teleop.pose_min_cutoff` | `0.8` | Tremor rejection while the hand is (near) still — One Euro filter's minimum cutoff (Hz) | Up to \~200 ms during *slow, precise* moves; negligible during fast ones |
| `--teleop.pose_beta` | `2.0` | How eagerly the One Euro filter opens up as hand speed rises | Higher = less lag during medium/fast motion, at the cost of passing more tracking noise through |
| `--teleop.ik_alpha` | `0.3` | Smoothing of the IK output before the velocity filter | \~19 ms at the default; \~8 ms at `0.5` |
If teleop feels too laggy, adjust in this order — one knob at a time, on the real robot, since the same smoothing is what makes contact-heavy work (deburring, insertion) feel good:
1. **`--vr_server.interp_smooth_window_s 0.08`** — buys back 20 ms; glitch rejection stays effective for the common short tracking glitches.
2. **`--teleop.pose_beta 4`** — snappier during motion, unchanged at rest.
3. **`--teleop.ik_alpha 0.4`** — a few ms, minor smoothness cost.
4. **`--teleop.pose_min_cutoff 1.2`** — only if slow precise work still feels sticky; this re-admits some at-rest tremor.
5. **`--vr_server.interp_smooth_window_s 0`** — disables the fixed-lag smoother entirely (pure jitter-buffer playout). Only worth it on a wired [USB connection](/guides/quest-over-usb) with a well-tracked controller.
The jitter buffer (`interp_max_delay_s`) self-regulates — it only adds delay while packet delivery is actually bursty, so lowering its cap mostly changes how much of a bad Wi-Fi episode gets smoothed versus played as a catch-up. If you're chasing network-induced lag, the [USB connection](/guides/quest-over-usb) and the [router settings above](#network-tip) are worth more than any knob here.
## Next steps
Drive the robot over the internet from anywhere with Tailscale.
Record teleoperation episodes to a LeRobot dataset.
| # | Button | Action |
| - | ------------- | -------------------------------------------------------------------------------------------------------------------------------------------------------------------------------------------------- |
| 1 | Left grip | Press both 1 + 2 together to **engage** both arms; once engaged, each grip **toggles its own arm** between tracking and frozen (a frozen arm holds its pose and grasp while the other keeps going) |
| 2 | Right grip | Same as above |
| 3 | Left trigger | Actuate left gripper |
| 4 | Right trigger | Actuate right gripper |
| 5 | X | **Reset** — returns both arms to the rest pose; also retries the return out of the contact hold (below) |
| 7 | Y | **Exit AR** — closes the VR session (the arms return to rest on the way out) |
**Per-arm engage.** From rest, press both grips together to start moving the arms. After that each grip is independent: a click **toggles just that arm** between tracking and frozen — a frozen arm holds its pose and keeps its gripper where it is (handy for steadying a grasped object) while the other keeps tracking. Prefer a hold instead of a toggle? Turn on **Hold grips to engage** (`--teleop.hold_to_engage`): hold both grips to start, release one to freeze that arm, keep holding to keep it going. Either way a forced disengage (reset, contact stop, or dropped link) drops both arms and needs a deliberate both-grips re-engage.
On hardware, every return to rest — an **X** reset, the **Y**-exit return, and the startup move — is **guarded**: a torque watchdog compares each joint against the gravity model while the move plays. If the move meets unexpected resistance (something still grasped, or you grabbing an arm), it stops where it is and the arms drop into a limp **gravity-compensation hold** — hand-guide them clear, then press **X** to replan home from wherever you left them. If no headset is connected to press **X** (a **Y**-exit return, or the headset died), the hold settles into a position hold where the arms are after \~30 s; reconnect and press **X** to send them home. Tune with the **Reset contact threshold** in the control panel's Robot settings (`--teleop.reset_torque_threshold` on the CLI; `0` disables the watchdog). Not available in `--sim` (no torque feedback — and nothing to protect).
**Contact stop while driving (opt-in).** The return-to-rest guard above is always on; you can also arm a watchdog for the **tracking** phase itself — while you're actively driving the arms. It's **off by default**, since teleop pushes on the scene on purpose. Set the **Teleop contact stop** in the control panel's Robot settings (`--teleop.teleop_torque_threshold` on the CLI; the panel suggests `16` Nm) and a sustained torque past the threshold **disengages tracking** and drops the arms into the same limp gravity-comp hold — hand-guide them clear, then press **X** to return to rest and carry on. `0` (the default) leaves it off. Hardware only.
**Losing the link never moves the robot.** If pose updates stop while tracking is engaged — you doff the headset, open the system menu, quit the VR app, or the link drops — the arms **auto-disengage** (freeze in place) after about half a second and then **hold position** wherever they are, for as long as it takes you to come back. Re-entering VR is inert until you deliberately re-engage (both grips), which takes a **fresh engage snapshot** — tracking resumes relative to where the arms already are, so they never snap toward wherever the controllers drifted during the gap. Press **X** when you want them back at the rest pose.
On a robot with the **powered Axol Cart**, the headset thumbsticks drive the cart's base and lift during teleop — see [Powered cart](/guides/vr-interface#powered-cart). Enable it with the control panel's **Powered cart** toggle or [`axol teleop --cart.enabled true`](/cli/teleop), or drive just the cart with the arms left untouched using **Cart only** / [`axol teleop --cart_only`](/cli/teleop).
## Network tip
If VR tracking feels jittery or arrives in bursts, configure the following on your router or access point:
| Setting | Value |
| ----------------- | -------- |
| DTIM interval | `1` |
| Beacon interval | `100` ms |
| WMM APSD (U-APSD) | disabled |
These prevent the AP from batching packets between beacon intervals, which causes intermittent latency spikes that are especially noticeable in VR.
## Latency tuning
Teleop deliberately trades a little latency for smoothness: the pose stream is buffered and filtered before it reaches IK so that controller tracking glitches and network jitter don't turn into arm jitter. The defaults add roughly **80–90 ms** between your hand and the commanded arm on a clean link — the table below shows where it goes and which knob controls each stage. All of them are CLI flags (or [config-file](/cli/configuration) fields); none require code changes.
| Knob | Default | What it buys | Latency cost |
| ------------------------------------ | ------- | ------------------------------------------------------------------------------------------------------------ | ----------------------------------------------------------------------------------------------------------------------------------- |
| `--vr_server.interp_smooth_window_s` | `0.12` | Zero-phase pose smoothing + tracking-glitch rejection (glitches up to \~half the window are erased outright) | **+60 ms**, fixed — half the window. The largest single contributor |
| `--vr_server.interp_max_delay_s` | `0.15` | Cap on the adaptive jitter buffer that replays bursty network delivery smoothly | 0 ms on a clean link (USB, quiet Wi-Fi); grows only while the network is actually jittery, up to the cap, and decays within seconds |
| `--teleop.pose_min_cutoff` | `0.8` | Tremor rejection while the hand is (near) still — One Euro filter's minimum cutoff (Hz) | Up to \~200 ms during *slow, precise* moves; negligible during fast ones |
| `--teleop.pose_beta` | `2.0` | How eagerly the One Euro filter opens up as hand speed rises | Higher = less lag during medium/fast motion, at the cost of passing more tracking noise through |
| `--teleop.ik_alpha` | `0.3` | Smoothing of the IK output before the velocity filter | \~19 ms at the default; \~8 ms at `0.5` |
If teleop feels too laggy, adjust in this order — one knob at a time, on the real robot, since the same smoothing is what makes contact-heavy work (deburring, insertion) feel good:
1. **`--vr_server.interp_smooth_window_s 0.08`** — buys back 20 ms; glitch rejection stays effective for the common short tracking glitches.
2. **`--teleop.pose_beta 4`** — snappier during motion, unchanged at rest.
3. **`--teleop.ik_alpha 0.4`** — a few ms, minor smoothness cost.
4. **`--teleop.pose_min_cutoff 1.2`** — only if slow precise work still feels sticky; this re-admits some at-rest tremor.
5. **`--vr_server.interp_smooth_window_s 0`** — disables the fixed-lag smoother entirely (pure jitter-buffer playout). Only worth it on a wired [USB connection](/guides/quest-over-usb) with a well-tracked controller.
The jitter buffer (`interp_max_delay_s`) self-regulates — it only adds delay while packet delivery is actually bursty, so lowering its cap mostly changes how much of a bad Wi-Fi episode gets smoothed versus played as a catch-up. If you're chasing network-induced lag, the [USB connection](/guides/quest-over-usb) and the [router settings above](#network-tip) are worth more than any knob here.
## Next steps
Drive the robot over the internet from anywhere with Tailscale.
Record teleoperation episodes to a LeRobot dataset.